
Installation of driveway pavers is a meticulous process that requires careful planning and execution. Each step must be carried out with precision to ensure a durable and aesthetically pleasing result for your property in Prescott, Arizona. From site preparation to finishing touches, understanding the key steps in the driveway paver installation process is crucial for a successful project.
Key Takeaways:
- Site Preparation: Proper site preparation is crucial for a successful driveway paver installation in Prescott, AZ. This includes clearing the area of debris, grading the surface for proper drainage, and compacting the soil to create a stable base.
- Paver Installation: The next step involves laying the pavers in the desired pattern, cutting them as needed to fit the space, and securing them in place with edge restraints. Proper spacing and alignment are necessary for a professional finish.
- Finishing Touches: Once the pavers are installed, the final steps include sweeping sand into the joints to lock the pavers in place, compacting the surface to ensure stability, and sealing the pavers to enhance their durability and longevity.
Planning Your Driveway Project
If you are considering installing a driveway using pavers in Prescott, AZ, proper planning is important to ensure a smooth and successful project. By following key steps in the planning phase, you can set the foundation for a durable and aesthetically pleasing driveway that enhances the curb appeal of your property.
Understanding Local Regulations and Permits
Permits – Before commencing your driveway paver installation project, it is crucial to research and understand the local regulations and permit requirements in Prescott, AZ. Different municipalities may have specific guidelines regarding the use of pavers, setback distances, and drainage considerations. Failure to adhere to these regulations could result in costly fines or having to redo the project.
Additionally, obtaining the necessary permits ensures that your driveway project complies with local building codes and standards, guaranteeing the safety and structural integrity of the installation.
Selecting the Appropriate Paver Material
Understanding – When deciding on the paver material for your driveway, it is important to consider factors such as durability, aesthetics, and maintenance requirements. Concrete pavers are a popular choice for driveways due to their versatility, strength, and variety of design options. Natural stone pavers offer a timeless and elegant look but may require more maintenance.
Local suppliers in Prescott, AZ, can provide expert advice on the best paver materials suited for your specific project needs, taking into account the local climate, soil conditions, and desired design aesthetic.
Measuring and Outlining Your Driveway Area
Planning – Before starting the installation process, accurately measuring and outlining your driveway area is crucial to determine the amount of materials needed and ensure a precise layout. Using measuring tools and marking the boundaries of the driveway will help prevent errors and minimize wasted materials.
With a clear understanding of the local regulations, appropriate paver material selection, and precise measurements in place, you can proceed to the next phase of your driveway paver installation project with confidence and efficiency.
Foundation Preparation
Once again, foundation preparation is a crucial step in the driveway paver installation process in Prescott, AZ. Properly preparing the base will ensure the longevity and durability of your new driveway.
Excavating the Driveway Area
The first step in the foundation preparation process is excavating the driveway area. This involves removing the existing surface material and digging down to the appropriate depth to accommodate the pavers and base layers.
The excavation process must be done carefully and accurately to ensure a level base for the pavers. Any unevenness in the base can result in an uneven driveway surface and potential issues in the future.
Ensuring Proper Slope for Drainage
An important aspect of foundation preparation is ensuring proper slope for drainage. It is crucial to have a slight slope in the base layer to allow water to drain properly off the driveway surface and prevent pooling.
It is recommended to consult with a professional to determine the appropriate slope for your driveway based on the local climate and conditions. Improper drainage can lead to water damage and deterioration of the pavers over time.
Laying the Sub-Base Material
Any quality driveway installation starts with a solid sub-base. This layer provides stability and support for the pavers, helping to prevent shifting and settling over time.
Preparation of the sub-base material involves spreading and compacting a layer of aggregate evenly across the excavated area. This layer acts as a foundation for the pavers and helps to distribute weight evenly.
Compacting the Base Layer
One of the final steps in foundation preparation is compacting the base layer. This is done using a compactor machine to ensure the sub-base is firmly packed and ready to support the weight of the pavers.
Plus, proper compaction helps to prevent the settling and sinking of the driveway over time. This step is crucial for creating a sturdy and durable foundation for your new driveway.
Edge Restraints and Sand Bedding
All successful driveway paver installations require attention to detail in both edge restraints and sand bedding. These two components play a crucial role in ensuring the longevity and stability of your paver driveway. Let’s examine the key steps involved in installing edge restraints and sand bedding.
Installing Edge Restraints
Sand The first step in the process is to install edge restraints along the perimeter of the driveway area. Edge restraints are crucial as they prevent the pavers from shifting or spreading out over time. They can be made of various materials such as plastic, metal, or concrete. Proper installation of edge restraints involves digging a trench along the edges, placing the restraints securely, and then backfilling with compacted material to ensure stability.
It is crucial to ensure that the edge restraints are installed at the correct angle and height to contain the pavers effectively. Additionally, the edges should be curved rather than straight to provide better support and prevent cracking or shifting.
Applying and Leveling the Sand Bedding
After the edge restraints are securely in place, the next step is to apply and level the sand bedding. The sand acts as a cushion for the pavers, allowing for minor adjustments and ensuring a level surface for the driveway. A layer of sand is spread evenly over the compacted base material, typically to a depth of 1 inch.
Bedding Once the sand is spread, it needs to be compacted and leveled using a screed board to achieve a uniform thickness. This step is crucial as it provides a stable base for the pavers and helps prevent uneven settling or shifting. Properly applying and leveling the sand bedding ensures a professional finish and increases the overall durability of your paver driveway. Gain deeper insights into How To Choose The Right Driveway Pavers That Can Handle Prescott’s Harsh Climate.
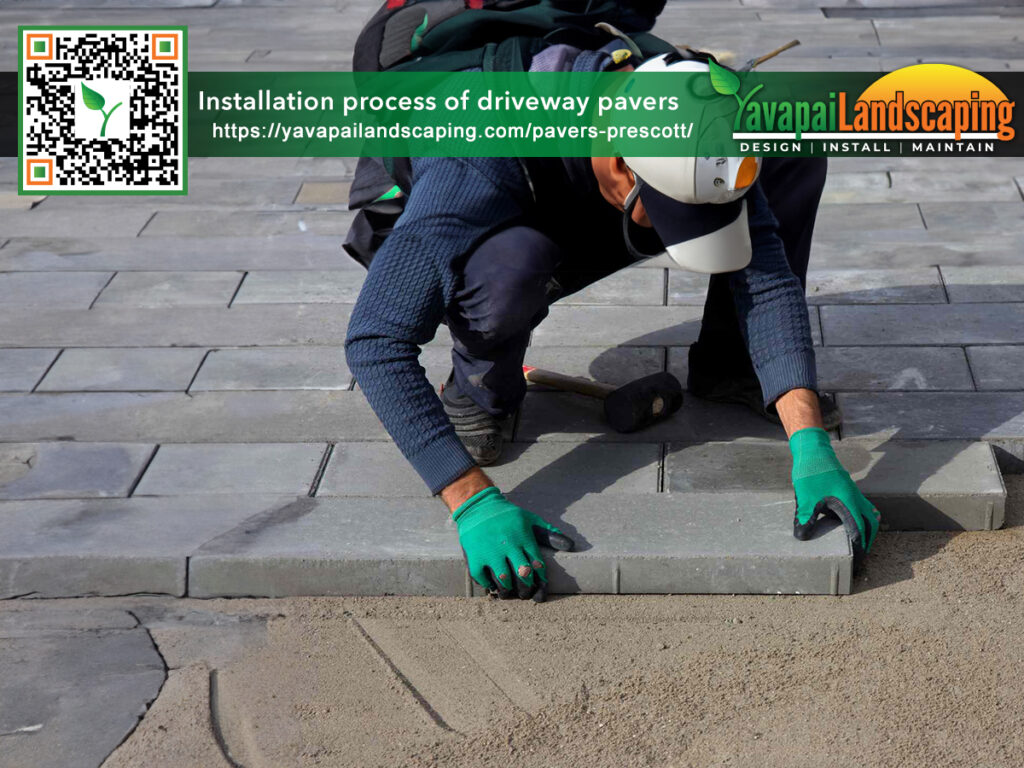
Laying the Pavers
Starting the Patterning Process
Keep in mind that the key to a successful paver installation is meticulous planning and precise execution. Starting the patterning process involves laying out the pavers according to the design you have chosen for your driveway. This step is crucial as it sets the foundation for the entire installation.
With a solid base in place, carefully arrange the pavers in the desired pattern. Take your time during this phase to ensure proper spacing and alignment. Starting the patterning process is where the visual appeal of your driveway begins to take shape.
Cutting Pavers to Fit as Necessary
Pavers may need to be cut to fit as necessary as you reach the edges of the driveway or encounter obstacles like posts or curves. This step requires precision and attention to detail to ensure a seamless finish. Use a saw or chisel to trim the pavers to the correct size and shape.
To maintain a cohesive look throughout the driveway, it’s important to cut pavers to fit as necessary in a way that seamlessly integrates them into the overall design. This meticulous approach will result in a professionally finished driveway that enhances the curb appeal of your property.
To ensure a professional finish, cutting pavers to fit as necessary is a critical step in the driveway paver installation process. By customizing the pavers to fit specific areas, you maintain a cohesive look and ensure a precise fit.
Ensuring Alignment and Leveling as You Go
To maintain a uniform and sturdy surface, it’s imperative to ensure alignment and leveling as you go during the paver installation process. Check the alignment of each paver using a straight edge or string line. Make necessary adjustments to ensure a flat surface that is both visually appealing and functional.
For instance, using a level periodically as you lay each row of pavers will help detect any uneven areas and prevent potential issues down the line. Ensuring alignment and leveling as you go is key to achieving a durable and aesthetically pleasing driveway that will stand the test of time.
Securing the Paver Driveway
Many homeowners opt for paver driveways in Prescott, AZ, due to their durability and aesthetic appeal. Securing the paver driveway is a crucial step in the installation process to ensure it remains intact for years to come. This involves applying joint sand for paver interlock, compacting the pavers once laid, and considering the option of sealing the pavers.
Applying Joint Sand for Paver Interlock
For optimal stability, applying joint sand between the pavers is crucial. This sand helps to fill the spaces between each paver, promoting interlock and reducing movement over time. To apply the joint sand, simply spread it evenly over the surface of the pavers and use a broom to push the sand into the gaps until they are filled.
Properly applying joint sand not only enhances the structural integrity of the paver driveway but also prevents weed growth and helps to maintain a uniform appearance. Ensure that the joints are adequately filled with sand to facilitate a tight interlock, reducing the risk of paver displacement.
Compacting the Pavers Once Laid
Paver driveways must be compacted once the pavers are laid to ensure they are firmly set in place. Compaction helps to eliminate any air gaps underneath the pavers, preventing shifting and settling over time. Using a mechanical compactor, the pavers are pressed firmly into the bedding layer, creating a stable and level surface.
The proper compaction of the pavers is crucial to avoid uneven settling, which can lead to dips and cracks in the driveway. It is recommended to hire professionals with experience in driveway paver installation in Prescott, AZ, to ensure the correct compaction process is followed.
Sealing the Pavers (Optional but Recommended)
The interlock of the pavers can be further strengthened by sealing the driveway. While sealing is optional, it is highly recommended as it provides an additional layer of protection against stains, fading, and weed growth. Sealing also enhances the color of the pavers, giving them a vibrant and long-lasting finish.
Driveway sealing should be done after the pavers have been properly cleaned and dried to ensure the best adhesion of the sealant. Consult with a professional paver installation company in Prescott, AZ, to determine the most suitable sealer for your driveway pavers and to ensure the application is done correctly for optimal results.
Maintenance and Upkeep
Not only is the installation of driveway pavers important, but also the maintenance and upkeep to ensure they remain in excellent condition for years to come. Proper maintenance can enhance the longevity and aesthetics of your driveway, keeping it looking pristine and welcoming.
Regular Cleaning Tips
Cleaning driveway pavers regularly is necessary to prevent the build-up of dirt, debris, and stains. Use a broom or leaf blower to remove surface debris and then wash the pavers with a solution of water and mild detergent. For tougher stains, consider using a pressure washer on a low setting to avoid damaging the pavers.
- Regularly sweep or blow debris off the pavers
- Clean with a mild detergent and water solution
- Consider using a pressure washer for tough stains
After cleaning, ensure the pavers are thoroughly dry before applying any sealant or making repairs to avoid trapping moisture underneath.
Spot Repair and Paver Replacement
With regular use, driveway pavers may experience wear and tear, leading to cracks, chips, or shifting. It is vital to address these issues promptly to prevent further damage and maintain the integrity of the driveway. Spot repairs can be done by replacing individual pavers or fixing minor damages to ensure a seamless surface.
The key to successful spot repair and paver replacement is using the right materials and techniques to match the existing pavers seamlessly. It is recommended to consult a professional to ensure the repairs are done correctly and blend in with the rest of the driveway.
Long-term Sealing and Protection
With the harsh weather conditions in Prescott AZ, it is crucial to provide long-term sealing and protection for your driveway pavers. Sealing the pavers can help prevent staining, fading, and erosion, extending their lifespan and maintaining their appearance.
To ensure the best results, it is recommended to seal your pavers every 2-3 years or as needed, depending on the level of wear and exposure to the elements. Choose a quality sealant that is suitable for your specific paver material and follow the manufacturer’s instructions for application.
Summing up
Hence, the key steps in the driveway paver installation process in Prescott, AZ are crucial to ensure a durable and visually appealing result. From planning and preparing the area to installing the base, laying the pavers, and finishing with sand and sealant, each step plays a vital role in creating a long-lasting and beautiful driveway. By following these steps carefully and accurately, homeowners can enjoy a professionally installed driveway that enhances the curb appeal and value of their property.
At Yavapai Landscaping, we provide expert snow removal services in Prescott, Arizona. Our team is dedicated to delivering efficient snow plowing, blowing, and shoveling to safeguard properties against winter hazards. We’re available 24/7, including holidays, ensuring safety and accessibility for our clients. We tailor our services to each property’s specific needs and utilize professional equipment for top-notch results. Our focus is on both residential and commercial clients, prioritizing their satisfaction and safety in all our snow removal tasks.